

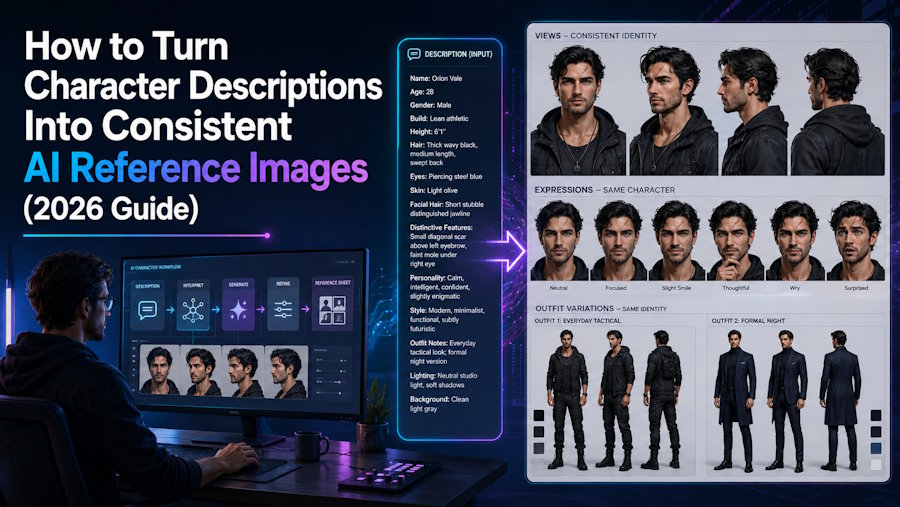
A strong character description can tell you who someone is, but it does not automatically tell an image model (such as Nano banana pro) what must remain visually consistent.
Details that feel precise to a writer—such as “a tired detective with sharp eyes and an old scar”—still leave dozens of visual decisions unresolved. How old is the detective? What shape is the scar? Which side of the face is it on? Does “sharp eyes” refer to color, shape, expression, or personality?
This is why generating one attractive character portrait is relatively easy, while producing the same recognizable character across multiple poses, expressions, outfits, and scenes is much harder.
The solution is to convert narrative prose into a structured visual specification before generating anything. With a browser-based AI Image Generater-画像生成AI, you can then turn that specification into a reusable reference sheet, test it across different views, and refine the character without rebuilding the design from scratch.
This guide explains the complete workflow.
What Is an AI-Generated Character Reference Image?
An AI-generated character reference image is a visual record of a character’s defining traits. It may be a single portrait, but a useful reference usually includes several views or expressions.
A complete reference set can contain:
- A neutral front-facing portrait
- Three-quarter and profile views
- Full-body front and back views
- Facial expression variations
- Clothing and accessory details
- Color references
- Close-ups of identifying features
- Notes about proportions or scale
The goal is not simply to create attractive artwork. The reference must reduce ambiguity for future illustrations, storyboards, animations, comics, games, advertisements, or AI-generated scenes.
A successful reference sheet answers a practical question: “What details must remain unchanged for viewers to recognize this person?”
Why Character Descriptions Often Produce Inconsistent Results
Written descriptions usually mix four different types of information:
- Identity traits: face shape, age, body type, skin tone, hair, eyes, and distinguishing marks.
- Styling choices: clothing, accessories, makeup, color palette, and hairstyle.
- Temporary states: expression, pose, action, weather, dirt, injuries, or lighting.
- Narrative information: occupation, personality, history, motivation, and relationships.
Image models do not always know which details are permanent. If everything appears in one paragraph, the model may treat an essential facial scar and a temporary rain-soaked jacket as equally important.
Consistency improves when identity information is separated from scene information.
For example, compare these two prompts:
Mara is a stubborn young mechanic who grew up in a desert settlement. She has short hair, a scar, practical clothes, and a suspicious expression.
This establishes a mood, but most visual details remain open to interpretation.
A more useful specification would be:
Mara, 27 years old, compact athletic build, warm brown skin, oval face, broad cheekbones, straight black eyebrows, dark amber almond-shaped eyes, short asymmetrical black hair with the left side shaved, and a narrow vertical scar crossing the outer edge of her right eyebrow. She wears a faded rust-red utility jacket over a charcoal shirt, dark cargo trousers, and a brass mechanical wrist brace on her left arm.
The second version gives the model visible attributes, locations, materials, and colors that can be checked.
Step 1: Extract the Character’s Visual Identity
Begin by removing any information that cannot be seen directly.
A sentence such as “He distrusts authority because of a difficult childhood” may be important to the story, but it is not a stable physical feature. Translate it into visible direction only when necessary, such as a guarded posture or restrained expression.
Organize the description into the following categories.
| Category | Questions to Answer |
|---|---|
| Demographics | What is the character’s approximate age and presentation? |
| Body | What are the height, build, posture, and proportions? |
| Face | What are the face shape, jaw, nose, lips, brows, and cheekbones? |
| Eyes | What are the color, shape, size, and spacing? |
| Hair | What are the color, texture, length, cut, and parting? |
| Skin | What are the tone, texture, freckles, moles, or other features? |
| Markers | Are there scars, tattoos, prosthetics, piercings, or birthmarks? |
| Clothing | What are the garments, materials, colors, and fit? |
| Accessories | Which objects are permanent parts of the design? |
| Palette | Which three to five colors define the character? |
Prioritize specific, observable language. “A distinctive nose” is subjective. “A long nose with a low bridge and slightly rounded tip” is easier to reproduce.
Step 2: Separate Fixed and Variable Traits
Create two lists before writing the final prompt.
Fixed traits
These must remain stable in every image:
- Facial proportions
- Eye color and shape
- Hairline and base hairstyle
- Skin tone
- Body proportions
- Scars, tattoos, or prosthetics
- Signature accessories
- Core color palette
Variable traits
These can change between images:
- Pose
- Camera angle
- Facial expression
- Background
- Lighting
- Weather
- Temporary clothing
- Props
- Action
This separation creates a simple prompt rule:
Keep the fixed identity block unchanged. Edit only the variable shot block.
Many consistency problems occur because creators rewrite the entire prompt for every scene. Even small wording changes can cause the model to reinterpret the character.
Step 3: Build a Character Identity Block
The identity block is the reusable core of every prompt. It should be detailed enough to define the character without including the current scene.
Use this template:
[Character name], [age range and presentation], [height and build], [skin tone], [face shape], [key facial proportions], [eye color and shape], [eyebrow description], [hair color, texture, length, and cut], [permanent identifying feature with exact location], [signature clothing and accessories], [core color palette].
Example:
Mara Venn, a 27-year-old woman with a compact athletic build and warm brown skin. She has an oval face, broad cheekbones, a softly squared jaw, dark amber almond-shaped eyes, straight black eyebrows, and a narrow vertical scar crossing the outer edge of her right eyebrow. Her hair is black, straight, chin-length, and asymmetrical, with the left side shaved. She wears a faded rust-red utility jacket, charcoal shirt, dark cargo trousers, and a brass mechanical wrist brace on her left arm. Her core palette is rust red, charcoal, brass, and muted sand.
Avoid filling the identity block with generic quality phrases such as “masterpiece,” “best quality,” or “highly detailed.” These words do not clarify who the character is.
Step 4: Generate the Neutral Identity Portrait First
Do not begin with an action scene. Start with the simplest possible image:
- Neutral expression
- Eye-level camera
- Front-facing or slight three-quarter view
- Even lighting
- Plain background
- No dramatic pose
- No object covering the face
Example prompt:
[IDENTITY BLOCK] Neutral character identity portrait, head and shoulders, facing the camera, relaxed mouth, direct gaze, even soft studio lighting, plain light-gray background, natural proportions, no dramatic perspective. Clean realistic concept-art rendering.
Generate several candidates and choose the image that best satisfies the written specification—not merely the most beautiful one.
Check whether:
- The face matches the intended age
- The hairstyle is readable
- Directional details appear on the correct side
- The identifying feature is visible
- The character’s silhouette is distinctive
- Clothing colors match the planned palette
This selected image becomes the identity reference for later generations.
Step 5: Expand the Portrait Into a Reference Sheet
Once the neutral identity is stable, generate a controlled set of views.
A practical reference sheet should include:
- Front-facing headshot
- Left three-quarter view
- Right three-quarter view
- Side profile
- Full-body front view
- Full-body back view
- Neutral expression
- Happy expression
- Angry or determined expression
- Surprised or fearful expression
Do not request every variation at once unless the selected model handles multi-panel sheets reliably. Generating each view separately often gives you more control.
Use the same identity reference and identity block for every image. Change only the shot instruction.
For example:
[IDENTITY BLOCK] Full-body character design reference, standing in a relaxed neutral pose, front view, arms slightly separated from the torso, feet fully visible, plain background, even lighting, no props, no motion, accurate anatomy.
For a profile:
[IDENTITY BLOCK] Clean left-facing profile reference, head and shoulders, neutral expression, eye-level camera, ear and jawline clearly visible, plain background, even studio lighting.
When writing profile prompts, be careful with left and right. AI-generated images may mirror directional details. Verify scars, shaved hair sections, tattoos, and mechanical limbs before accepting the result.
Step 6: Use a Shot Matrix Instead of Random Variations
A shot matrix helps you test consistency systematically.
| Test | Camera | Expression | Framing | Purpose |
|---|---|---|---|---|
| A | Front | Neutral | Headshot | Establish identity |
| B | Three-quarter | Neutral | Headshot | Test facial depth |
| C | Profile | Neutral | Headshot | Test silhouette |
| D | Front | Neutral | Full body | Test proportions |
| E | Front | Happy | Headshot | Test expression |
| F | Front | Angry | Headshot | Test expression |
| G | Three-quarter | Neutral | Waist-up | Test clothing |
| H | Back | Neutral | Full body | Test rear design |
Change one major variable at a time. If you simultaneously change the camera angle, expression, outfit, lighting, and art style, you will not know which change caused the character to drift.
A Reusable Character Reference Prompt
The following prompt can be adapted to most character types:
Create a professional character design reference image. Character identity: [Insert the complete identity block.] Reference requirements:
- neutral standing pose
- full body visible from head to toe
- natural anatomical proportions
- front-facing view
- arms slightly away from the torso
- signature clothing and accessories clearly visible
- identifying marks in their exact specified locations
- plain neutral background
- soft, even lighting
- no dramatic perspective
- no motion blur
- no extra objects
- no text or watermark
Visual treatment: [photorealistic / anime / graphic novel / 3D character concept / children’s-book illustration], consistent materials and color palette, clean production-ready character design.
If the result contains unwanted elements, add exclusions that describe the problem precisely:
Avoid: cropped feet, hidden hands, duplicated accessories, asymmetrical eyes, altered hair color, mirrored scar placement, exaggerated perspective, dramatic colored lighting, busy background.
Negative instructions are most useful when they address a defect you have actually observed.
How to Measure Character Consistency
Visual judgment can become unreliable after reviewing many variations. A small scoring system makes comparison easier.
Score each category from 0 to 2:
- Face: Do the facial shape and proportions match?
- Hair: Are the cut, hairline, length, and color stable?
- Markers: Are scars, tattoos, and accessories correct?
- Body: Are the height, build, and proportions consistent?
- Palette: Are the main clothing and identity colors preserved?
A generation can score a maximum of 10.
- 9–10: Strong enough to add to the reference set
- 7–8: Usable after minor correction
- 5–6: Significant drift; regenerate
- Below 5: Treat as a different character
For strict production work, you can also compare ratios such as eye spacing, face width to face height, shoulder width, and leg-to-torso length.
Common Problems and How to Fix Them
The face changes in every image
Reduce the number of stylistic adjectives and strengthen the facial geometry. Use the same neutral portrait as a reference instead of relying only on text.
The character looks older or younger
State an age range and add visible age indicators. “Young” can describe anything from a teenager to someone in their thirties. Use wording such as “approximately 28 years old, smooth skin, no visible facial lines.”
A scar or tattoo moves to the wrong side
State the location anatomically and visually. For example:
A narrow scar over her anatomical right eyebrow, appearing on the left side of a front-facing image.
Even then, inspect every result because some models mirror images.
Clothing changes between poses
Describe garments as separate objects with fixed colors and materials. “Fantasy clothing” is too broad. Specify “a dark green wool cloak fastened with a circular brass clasp over a cream linen tunic.”
Full-body images lose facial identity
Generate a strong portrait first and reuse it as a reference. Full-body compositions allocate fewer pixels to the face, making small identity details harder to preserve.
The result is attractive but generic
Add two or three high-information features rather than more adjectives. An asymmetrical haircut, a distinctive eyebrow shape, and a mechanical wrist brace contribute more identity than phrases such as “beautiful,” “epic,” or “highly detailed.”
Different art styles create different people
Lock the character in one visual style before experimenting. After the identity is stable, change the rendering style while preserving the same reference image and identity block.
Create a Character Bible for Long-Term Projects
For a one-off illustration, a prompt and portrait may be enough. Longer projects need a character bible.
Store:
- The approved identity block
- The selected neutral portrait
- Front, profile, and full-body references
- Exact color values
- Clothing descriptions
- Accessory placement
- Approved expressions
- Prohibited changes
- Prompt version number
- Model and settings used
- Notes about recurring generation errors
Version the identity block whenever you intentionally change the design. For example:
- MARA_ID_V1: original concept
- MARA_ID_V2: shorter jacket and darker hair
- MARA_ID_V3: final scar placement and wrist-brace design
This prevents accidental mixing of outdated traits.
Responsible Use and Commercial Projects
AI-generated reference images should be treated as part of a design process, not as permission to imitate a real person or protected character.
Before commercial use:
- Confirm the platform’s current licensing terms
- Avoid using a real person’s likeness without consent
- Do not request a near-copy of a living artist’s distinctive style
- Check trademarks and recognizable costume designs
- Keep records of prompts, references, edits, and approvals
- Review important work for cultural stereotypes or unintended bias
- Use human review before publishing client-facing material
If the character will appear in a game, advertisement, book, or merchandise line, verify both the generated image and every uploaded reference.
Frequently Asked Questions
Can AI create the same character in multiple images?
Yes, but text alone is rarely sufficient for strict consistency. The most reliable workflow combines a fixed identity prompt, an approved reference portrait, controlled shot changes, and repeated quality checks.
How detailed should a character prompt be?
Include details that affect recognition: facial geometry, hairstyle, body proportions, permanent markers, signature clothing, and palette. Remove backstory unless it can be translated into a visible feature.
Should I generate a character sheet in one image?
You can, especially for early ideation. For production references, separately generated views usually provide better resolution and make it easier to reject one inaccurate angle without discarding the entire sheet.
What is the best first image to generate?
Start with a neutral head-and-shoulders portrait using even lighting and a plain background. It gives you the clearest view of facial identity.
How many reference images do I need?
A basic set needs at least three: a neutral portrait, a profile, and a full-body view. A production-ready set should also include three-quarter angles, back view, expressions, and detail close-ups.
Can I change the character’s outfit later?
Yes. Keep the physical identity block unchanged and replace only the wardrobe section. If an accessory is essential to recognition, preserve it across outfits.
Why does my character look different in dramatic scenes?
Complex lighting, extreme perspective, action poses, and partial occlusion all reduce the model’s attention to identity. Establish the character in simple reference images before introducing those variables.
Final Thoughts
Turning a character description into useful AI-generated reference images is not a one-prompt task. It is a small design system.
Start by translating narrative language into visible attributes. Separate permanent identity traits from temporary scene details. Generate a neutral portrait, build a controlled set of views, and measure each result against the same specification.
The most important principle is simple: change the scene without rewriting the person.
Once you have a stable identity block, approved reference images, a shot matrix, and a basic quality score, you can create new poses and environments much faster while keeping the character recognizable across the entire project.

